

An institutional commitment to accessible online content must start with the content creators. At most institutions, content usually starts with Microsoft Word. While there are several things content creators can do to improve the accessibility of Word documents for individuals with disabilities (see our cheatsheets on Word for Windows and Word for Mac for specific examples), I am convinced that the single most important thing that they can do to enhance the accessibility of their documents is to start using true headings in Word (headings that appear in the Styles ribbon). In most documents sighted users rely on headings to scan through the document and navigate to relevant sections. Using true headings provides this same functionality to many users with disabilities, especially those who are blind. However, this can be quite an adjustment for someone who is used to creating headings by selecting text and making it bigger, bolder, underlined, centered, etc.
Below I offer a few reasons why using true headings will make life easier not just for individuals with disabilities, but for you, the document creator.
It is faster
It usually takes at least three steps to create false headings: change the text size, add bold or italics (or both), and select a different font. Adding a true heading is much simpler—just select the correct button from the Styles ribbon at the top of the page.

If you are a person who likes to use keyboard shortcuts, you can also create heading levels 1-3 by pressing Ctrl + Alt + 1, 2, or 3 (command + option on a Mac). Once this shortcut becomes habit it can save a considerable amount of time.
Changing visual styling is straightforward
The number one complaint I hear from people who choose not to use true headings is that they are ugly or too confining. While this can be true, changing the appearance of these headings is not as difficult as some may fear. There are two main ways to change the visual style of a page. First, you can change the appearance of the entire document with the Change Styles option on the right-hand side of the Styles ribbon:

Second, if you would rather tweak the appearance of an individual heading level (e.g., you would like your h2s to be italicized), you can accomplish this in Windows by right clicking on a specific heading in the Styles ribbon and selecting Modify. You can even do the reverse—select a block of text that has been styled correctly, right-click the desired heading in the ribbon and choose Update [your heading] to Match Selection. On a Mac you would select the icon to the right of the Styles menu with hover text of “Manage the styles used in this document.†This enables you to modify any part of your heading to achieve the style you desire.

While it does take a while to learn your way around these different options, it becomes a tremendous time saver.
Creating a Table of Contents is simple
If a document has a correct heading structure, Word can also create a table of contents for you based on the document’s heading structure. In Windows, go to the References tab and select Table of Contents. On a Mac, select the Document Elements tab and then you can directly select the Table of Contents in the format you would like it to appear.
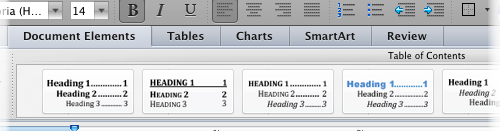
You can also customize the table of contents to change its appearance or choose which heading levels will appear (e.g., Heading levels 1-3). If you make changes to the document that affects page numbers within the table of contents, you can always go back to it and choose Update.
The document is easier to create and to read
There’s a reason your 5th grade teacher taught you to start your essay by creating an outline. Documents that include headings from the start tend to be more consistent in their structure, easier to follow, and even better written. Your readers will be able to read and navigate your pages more efficiently if they can come to expect a consistent heading structure, and I am convinced that you will find it easier to write the document as well.
Thank you! I’ve been saying the same things for years!