Voices from the Field: How Local IT Support Can Help Faculty

Last month we profiled the experience of a faculty member in the midst of changing her professional practices to include accessibility. This month, we are sharing the experiences of the IT support staff for the same department. Below he shares thoughts about working across a dozen faculty members to help them learn to create accessible materials for their online courses and the online elements for their campus-based courses.


By Karl Smith

The Department of Special Education and Rehabilitation at Utah State University recently began the process of making all of its course materials accessible.  I was happy to learn of this initiative as I believe not only should my department be compliant with accessibility standards, but that it has a responsibility to set an example in this regard.

While we do have some specific needs for current students which must be met, we also wanted to educate our entire faculty on best practices, and raise the quality of their teaching in general. As the department Technology Specialist, I have tried to offer my knowledge and assistance wherever I can.

As the IT support person, I get called whenever someone tries to do something unfamiliar with technology.  And while there are plenty of direct answers to questions regarding accessibility tweaks (most covered by materials developed by GOALS) I’ve also found myself giving the following answers with relative frequency.

“All students should have substantively the same experience”

It’s amazing how quickly people can lose sight of the big picture, and probably not too surprising that they lose track of this one.  When you’re teaching someone to make a Word document or PowerPoint presentation accessible the big picture isn’t really relevant; you’re teaching them features of Word or PowerPoint.  But once that faculty member takes those lessons back to their office and starts tweaking their own course materials, they seem to lose track of “Why?”,  and an hour or two later I inevitably get a call.  After they try to explain how they’re jumping backward through hoops mangling their document, “Why?” is ultimately the question I have to ask them.  And generally, it’s because they’ve lost sight of this one simple principle.

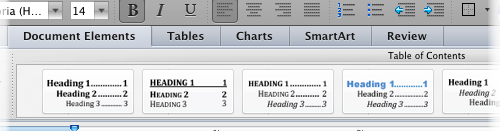
Designing accessible materials does not mean you can’t teach your class the same way you always have.  You can still communicate with students in the same ways.  You can still teach as you always have.  But a bit of design breadth when creating course materials makes those materials usable by students in multiple ways.  A Word document with proper heading structure looks the same when printed, but is also navigable by screen readers, or even parse-able by document restructuring tools (like something that may make a website out of it).  The goal is not to change the look of your documents, nor do you need to make multiple versions of your materials for students with various disabilities.  The goal is to make your normal documents and methods more broadly accessible, so all students have as similar an experience as possible.

“We’re doing this over 3 years”

Cyndi Rowland has consulted with us several times during this process, and one of her early pieces of advice was not to rework everything at the same time.  It’s painful, it’s frustrating, and people don’t have the time to DO it.  Rather, make the commitment that everything developed from this moment forward will be developed accessibly.  This way, no one has that annoyance of reworking something, and in a few years the vast majority of your materials will have converted naturally.  You should probably also pick a completion date, and as that date approaches you may have to deliberately rework documents that won’t be replaced naturally.  But that will be a LOT less frustrating.

We really liked Cyndi’s advice, and the department has committed to a 3-year turnover schedule.  Of course, there are some materials that need to be reworked more aggressively for students currently in our programs who have disabilities.  But in general, this is our plan.  Unfortunately, it’s difficult to learn these techniques and processes without a document to practice on.  So the first document any faculty member works on will generally be a rework of materials they already developed.  And this seems to set up an internal “I need to rework all my existing materials” expectation which was not intended.

“The Disability Resource Center is not always the answer.  But it’s a good resource!”

Okay, this might take a bit of history.  As recognition of the needs of people with disabilities has evolved through the past several decades, many institutions developed some form of central disability services office.  Frequently on campuses, this is called a Disability Resource Center (DRC).  As these were primarily developed in an age where wheelchair ramps or other physical accessibility issues were the most recognized problems; these services focused on accommodating the needs of a person with a disability in the moment.

More recently, especially with developing focus on e-learning, this accommodation model is proving insufficient to the needs of students.  When an entire campus tries to meet their accessible course material needs through the DRC, the DRC tends to have insufficient resources.  As this problem grows, the principle of “similar experience” become difficult to maintain, and sometimes impossible.  When this breaks completely, students have begun bringing lawsuits against institutions, which they are increasingly winning.  Laws are changing to help define the needs of persons with disabilities; but this is an evolving area.

What I have found is faculty often expect the past accommodation model to be sufficient.  I explain the problems with the current model, and how faculty can better meet the needs of their students.  But this is not to disparage the local DRC!  Disability Resource Centers also recognize these problems, and are working to develop solutions.   This may be anything from centralizing efforts to make PDFs accessible to captioning services for videos to converting your handouts into braille.

The particular things I’ve needed to point out to faculty are:

  •  “If you ask the DRC to rework a document as you are developing your course materials, it only has to be done once.  If materials are reworked for each student as you teach the course, the work will be repeated every time you have a student with a disability.  Simple conservation of labor makes submitting the document up front a better solution.”
  • “Having the DRC rework a document takes time.  If documents are submitted as needed by a student, this prevents that student from having materials in a timely manner, preventing them from taking part in class discussions and possibly holding up exams.  Not only does this violate the principle of similar experiences, it makes more work for you.”

Contact your DRC, and find out what resources they have.  As an educator, you can take advantage of their capabilities as you develop course materials.  They’ll appreciate that you are being proactive, and saving them both repetitive work, and being pressured by students who need documents immediately.

“Yes, you can still do ______”

After the first workshop with faculty, and thus after we had explained the difficulties with poor visual contrast, I saw a sudden push among some faculty to make all their PowerPoint’s black on white.  Some were going for pure Arial.  While it was good to see the awareness and concern, it was also saddening that our faculty felt their creativity needed to be stifled.  Some quite colorful slides were “cleansed” –   backgrounds were stripped and aesthetics ransacked.  This is not necessary.  Try to watch for faculty who are gutting their course materials.  Make sure they understand, they CAN do that neat thing they want.  They CAN be creative.  They just need to be conscious of a few things when doing so.  Honestly, some of these “how can I do this” conversations have been challenging, fun, and strangely enlightening.  Sometimes I’ve had to reach for outside ideas and assistance.  But I’ve yet to find something that cannot be done.

“Alt text is very, VERY subjective.  What did you intend to convey with this graphic/chart?”

This usually comes up during workshops, as every document that can include charts or images now has a tool to add ALT text to said chart or image.  Unfortunately, there is not always one right answer for what should go in that field, or even if anything should.  And now that programs like PowerPoint or Acrobat include an “Accessibility Checker,” I always try to stress it can only check for the presence of ALT text, and cannot evaluate its quality or need.

There are various rules for how ALT text is structured (no “picture of” for example).  But when explaining how to decide what content to put in the field, I usually ask why the image or chart is there to begin with.  A chart may only be included so the viewer can tell that a trend line increases over time, so “Chart showing increase in X over Y time” may be appropriate.  Or you may intend the viewer to get a few specific details, so you need to specify those details.  If you wanted really complex data analysis, it’s likely better to incorporate a navigable table in some way.  But in some contexts, even a complex chart may be decorative.

We had one discussion during a workshop about a graphic which the faculty member had included simply to amuse their students.  It was only tenuously related to the topic, and was just included to lighten the mood.  Different faculty thought it should be removed, left but not tagged, or tagged in detail with an attempt to describe the joke.  Any of these options could have been right; and I think the discussion helped them see how difficult it is to create rules regarding ALT text.

Ultimately, you need to help your faculty see this process as beneficial.  Not only will their efforts help their students with disabilities engage equitably in their classes, it may also help them to reflect on the purpose and message of their materials, improving the quality of learning for everyone.  If your faculty can embrace rather than resent accessibility initiatives, they can do some amazing things which will reach more students than ever before.

Presentation Template: Making the Case for Web Accessibility

We have had several requests from folks who would like help creating content they could use as they work to obtain buy-in from others at their institution (e.g., Administrative decision makers, faculty and staff).  The PowerPoint file below is one complete presentation that was used for this purpose.  Feel free to use all or some of this content as you work to create something that will resonate with your own audience.

Please do make sure to keep the GOALS attribution (last slide) intact. Also, please let us know how you are obtaining buy-in, as we would love to share your successes, and methods, with others.  If you modify this presentation we would love to see how your final materials speak to your own audience. It may help someone else think through this critical step to get web accessibility work started at their own institution.

Views of a Faculty Member: Accessibility from where I stand

We invited Kimberly Snow from The Department of Special Education and Rehabilitation at Utah State University to write a guest blog post. She wrote on her her experiences with accessibility as a faculty member.


During my summer break I was asked to spearhead a project for our department. I was given the charge to figure out how to make the courses taught by our faculty accessible to all students. The idea was that, over the summer, I would make my own courses accessible first, then help other faculty members do the same to their courses when the Fall term began. Our department not only recognizes the fact that we are “encouraged” to prohibit discrimination by the Rehabilitation Act of 1973 and the Department of Justice by making our courses accessible to all students, but more importantly it acknowledged this is the RIGHT thing to do.

I was initially excited because I am fortunate enough to work in a department with caring faculty members who are advocates for all individuals with disabilities. I thought this would be a great project for me to tackle, and shouldn’t be that difficult. As it turns out I was partly correct in this assumption. Here is my four step process:

Step One: Get informed

I feverishly began my research on exactly what it means to make course materials accessible and how to go about it. I was directed to two different websites that soon became my go-to sites for information and answers. One site I visit often is WebAIM (Web Accessibility in Mind). Even though this website is directed more technically towards making websites accessible, I found it helpful in giving me important background.

Here is some content I found helpful:

  • what is accessibility
  • who benefits from making websites (and materials) accessible
  • what individuals, who require accessible sites, are saying about their own experience(s) with accessibility
  • tips to implement when making websites accessible
  • what the law says about accessibility
  • what we need to do to comply with the law

After reading much of the information on this website, I began thinking this was going to be a little more daunting than I had thought originally. For me, it was information overload. I needed to be reigned in at this point. The second website I visited did exactly that. The National Center on Disability and Access to Education (NCDAE.org) currently has a project, Gaining Online Accessible Learning through Self-Study (GOALS). This website provided me with valuable information from articles and access to “cheat sheets” that assisted me in honing in my thoughts and addressing the important components in making a course accessible. These cheat sheets were developed specifically for “less-technical” individuals such as myself. I found my direction outline using the cheat sheets and was now ready to implement.

The cheat sheets cover the following accessibility topics:

  • Microsoft Word 2011 (Mac)
  • Microsoft PowerPoint 2011 (Mac)
  • Microsoft Word 2007/2010 (Windows)
  • Microsoft PowerPoint 2007/2010 (Windows)
  • PDF Conversion in Microsoft Word/PowerPoint 2007/2010 (Windows)
  • Adobe Acrobat XI
  • Adobe Acrobat X
  • Adobe InDesign CS5.5
  • Creating Accessible Electronic Content
  • Identifying Web Accessibility Issues
  • Captioning YouTube Videos

Step two: Make my own content accessible

Now I was ready to make my own courses accessible. To begin, I tried to apply all I had learned into making one of my courses accessible all at the same time (i.e., whatever was in week one, I tried to make accessible). It proved to be too much at once! Since my goal was to have one course that could be used as a model course for the faculty by the end of my summer, I realized I could take a different path. I knew I wanted to experience all the accessibility topics before I actually presented them to the faculty, but I decided to tackle only one type of accessibility fix across my course at a time. This means I made all of my PowerPoint presentations for the entire course accessible at the same time, then all Word documents, then all my pages on our course management system, then converted all of the PDF readings (52) to ensure they were accessible, as well as added transcripts to all of my videos and YouTube videos (16+) and added closed captioning.

With this experience of retrofitting for accessibility, I came up with a better plan for my faculty and how they should go about their own course accessibility. Instead of retrofitting one entire course to be accessible at a time, I suggested they just begin where they were. As they create/revise a PowerPoint, make it accessible; when they post a reading for students they make it accessible too; as they add a video to their assignments, be sure it is accessible. This is a much easier plan and not as overwhelming for faculty as the notion of retrofitting everything.

Step three: Decide on a sequence for faculty

At this point I felt I had enough background information and preparation to begin training our faculty on how they can go about making their courses accessible. Using my own experience I decided on the order of topics to be addressed.

  1. PowerPoint
    I began with PowerPoint because my experience with it was less daunting and it was a more easily understood topic. I wanted to ease them into this process without scaring them away. Also, at the beginning of the semester faculty members are preparing their lectures and could use this information in their preparations.
  2. Word Documents
    I had the most fun with Word documents, so I thought this would be a good second choice. My initial learning for accessibility took quite a bit of time, but once I had it figured out I had fun with it and used styles with everything I created. This helped me with both accessibility and non-accessibility features (e.g., auto generated table of contents are great).
  3. PDF
    PDFs would be the third topic, yet they were a little more difficult for me to embrace, let alone train other faculty members to make accessible. I increased my understanding of how they look to a screen reader and the process it takes to make them accessible. I needed, and will continue to need, additional support to make this happen. Thankfully, I have technical support in my department that can help me when needed. However, I am more aware of what I need to look when selecting articles, readings, and other items that are only available online as a PDF.
  4. External Websites
    Next, I presented a way for faculty to evaluate the accessibility of the external websites they might select for students to use in their classes. I showed them how to use the WAVE tool to detect problems and be a sort of weather vane for accessibility . This process was interesting and fairly simple. It took very little time to learn. Yet because you have no control of an external website you do not have to worry about adding time to make corrections; unless you notify the creators of the website that their site is inaccessible or could be more accessible. However, if found to be inaccessible, it might take more time to find a suitable alternative.
  5. Videos
    The video topic was put last on the list because other university staff and I were still trying to figure out this issue. Many of the videos I personally select for my courses are not ones I produce or upload. If I owned them and put them onto YouTube for example, getting them captioned is a pretty straightforward process. Getting a procedure to add closed captioning to the videos of other people was very tricky, not as simple as originally thought. So good luck if what you want to use is on YouTube and you are not the owner of the media file. Copyright issues come into play, deciding on the most efficient procedure to accomplish this, as well as other unforeseen issues were all considered. I will still need additional assistance to make some of my videos accessible. Sad to say, I don’t have a lot of positive information I can share with faculty.

Step four: Let the process begin!

Once I determined the topics and the order of presentation I was ready for the process to begin. Following is the schedule of training:

  • Faculty Retreat– During a faculty retreat, held before the start of the school year, I took 20 minutes to present to the faculty the agenda for the school year in regards to making their courses accessible. During this presentation I spent time getting understanding and buy-in from faculty; although our Department Head was mandating it regardless. I gave examples of accessibility and what students with disabilities encountered in regards to materials and resources in courses taught. Then I presented the plan for our Department and an agenda for the year on how we could address these issues and make our courses accessible over time.
  • Faculty Meeting– During each faculty meeting, held monthly, I presented one topic (listed above). During these meetings I took approximately 15 minutes to introduce the accessibility topic and gave examples of how we go about addressing the accessibility issues involved with the topic. I gave them the corresponding “cheat sheet” and encouraged them to “play around” with what they had learned before our next meeting.
  • Workshops– Two weeks following the faculty meeting I held a workshop for faculty on the topic discussed in the faculty meeting. The workshop lasted one to two hours depending on questions and involvement. Faculty was encouraged to bring their own computer, “cheat sheet”, and be ready to create or edit a project/materials/resources they have or use. During the workshop, I reviewed the topic introduced in faculty meeting, worked through an example using the information presented on the “cheat sheet”, then allowed faculty time to practice what they learned using their own materials/resources.

Through this entire process I had the assistance from our Systems Administrator to answer additional questions and to provide technical assistance when needed. His service was invaluable and this would not have happened without his assistance.

We are still working through this process and our Department Head has not yet determined how he will evaluate conformance to his decision, or evaluate the training and technical assistance that I am providing. My guess is at some magic moment, he’ll ask everyone to submit sample accessible materials from across their courses. We’ll see.

Reflections

Our faculty has been very receptive to making the courses they teach accessible to all students. We understand the need and the responsibility to deliver materials and resources in an accessible format. Initially, it was imperative that the tasks be broken down into small steps and that we had the right technical support in place. Without these, any faculty may be overwhelmed and afraid to tackle accessibility. However with support and understanding, this necessary project can bring some new professional skills. I was personally excited that it was not as daunting as I initially thought. Time will tell, but I think our outcomes will be positive and helpful in creating more accessible web content.

Reflections on accessibility expectations: Faculty are expected to do what?

At NCDAE, we have long been a proponent of putting the responsibility for accessibility in the hands of those who are closest to creation of web content and products. In higher education this would mean technical individuals must produce markup that conforms to the chosen accessibility standard; vendors must deliver an LMS that conforms to the standard; faculty must create accessible content before it is loaded into the LMS (e.g., PowerPoint); and staff must create accessible documents that might end up on a website (e.g., PDF or Word docs).

While it is intuitive that the locus of control and performance expectation should reside closest to the source, it is critical that all accessibility committees and managers examine their expectations, to see if they are reasonable. If deemed reasonable, training and support structures must be present to make these expectations a reality. If they are deemed to be unreasonable, a plan must be put in place to accomplish the same task, perhaps with different individuals taking on different roles, or an overall different plan of attack. For example, an individual skilled at tagging PDF’s may be responsible for retrofitting complex PDF’s for faculty in a specific college or department. At the end of the day, the institution must deliver content that meets their accessibility standard. How this is accomplished, and who accomplishes it is the tricky part. It is a challenge to determine how best to share the responsibility for accessibility while also recognizing that limitations do exist, and then plan for it.

I am reminded of an old saying, “Don’t blame people for disappointing you, blame yourself for expecting too much” (unknown). In this past year, our GOALS experiences have caused us to reflect on just where the line in the sand should be in our expectations for non-technical individuals.

Here are a few examples of what we mean:

  1. Most agree that faculty & staff should use styles native in Word to help create semantic structure when they create a document. This includes items such as heading levels and lists.
    • Do you think they should be responsible to create an accessible document if complex tables were involved in a Word document? Frankly, given the limitations of Word (e.g., inability to tag column and row headers in a table), the next best solution is to either convert to HTML or save as PDF and then tag the tables. If you believe they should produce this content accessibly, they must understand what to do, or to whom they should turn to for help.
  2. Most agree that faculty & staff should provide alternative text for non-text images in PowerPoint.
    • Do you think they should also provide alternatives for complex charts, graphs, maps and other images that typically convey complex content? We agree that the content creator is the best to convey what should be conveyed, but the question is how should they convey it? If you have provided them with guidance that alternative text should be succinct, how (and where) do they provide these longer descriptions?
  3. Most agree that faculty & staff should be able to search for captioned media to embed into their course and even use the YouTube feature to upload a transcript and caption media they own.
    • Do you think they should be responsible for captioning all YouTube media they want to use in their course, even when they are not the owner of the video file? What about other media they find on the web?
  4. Most agree that faculty and staff should be able to export to PDF in accessible ways, tagging clear heading structure and reading order.
    • Do you think they should also be responsible for tagging PDF files with complex tables, a complex layout, or multiple form fields? Is there a difference in asking faculty and staff to create an accessible PDF from the ground up versus retrofitting a PDF? Are there lines where the PDF being retrofitted is so complex you would not expect them to have the skills to do so? These are important parameters to understand.
  5. Most agree that faculty and staff should only link to accessible web content if they require that the user go to other web pages (e.g., students must go to outside links to complete an assignment).
    • Do you think they should have the skills to evaluate the technical accessibility of that web content? If not, they would be unable to identify what conforms to the institution’s accessibility standard and what does not. If you think they should, how is this task possible when evaluations are technical in nature and many require manual checks (e.g., accessibility of JavaScript elements). Remember these are by-in-large staff that are not technical.

Notice these examples all center on non-technical individuals. Readers of our blog likely agree that technical personnel should produce accessible products without question. However, in a time when much web content is produced and delivered by nontechnical individuals, what are the most reasonable expectations?

Faculty and staff should not be expected to achieve accessibility alone, yet they should still be held responsible for the accessibility of their content. This seeming contradiction is best solved when there are explicit expectations, training, and just-in-time supports. If faculty and staff understand what is expected to be their responsibility–and when the task should fall into more technically skilled hands–they will be more likely to participate with the institution’s efforts. When creating accessible content goes beyond what would be expected of them, they should know whom to contact, where they take it, and specifics on the turnaround time. In my many years teaching, I must admit that I would complete class materials and PowerPoint presentations just in time for each class. If I were required to provide materials a week ahead of when I needed it, I might be in trouble.

It goes without saying that training specific to what faculty and staff are asked to do must be delivered to them. But, another critical aspect is the support they are offered. When a staff member has a question, whom do they call? What are the times available for staff members to make these calls? Not many institutions have included accessibility supports into their faculty help desks, but perhaps the time is right for this solution. Faculty members who receive just-in-time supports improve their knowledge and skills. Having these discussions at your institution will help you create the best solutions so content creators can assume responsibility for the accessibility of their content.


Note: Next month you will be hearing directly from a faculty member who implemented accessibility across her classes. She will describe her own experience with the items she could implement and those she could not. She received individual training and support, which is not common in postsecondary settings. Her experiences illustrate an emerging challenge in our web accessibility efforts. We hope you will read her guest blog, and that it helps provide perspective, and fodder for discussion at your institution.

How to Use our Accessibility Cheatsheets

Over the past year or so, GOALS has been developing a series of cheatsheets to help faculty, staff, and other content creators produce more accessible content. Response to these sheets has been extremely positive and we plan to continually update these resources as new techniques and technologies become available. We have recently reorganized our main cheatsheet page by type of technology (instead of date published) and have just created a new cheatsheet for Acrobat XI.

As the popularity of these resources continues to grow, we wanted to take a minute to cover how we believe these resources should (and should not) be used.

During my first year of college I had a professor who took great pride in his difficult tests. However, he did allow one single-sided sheet of handwritten notes. I remember spending a tremendous amount of time copying text in the tiniest size I could manage until I was confident the sheet contained every bit of possible information. I’m sure most of you can guess the outcome—I spent most of my time looking up every answer and struggled to finish the test before time ran out. During the next test I filled the sheet with about a third as much information, things like unfamiliar names and specific dates. I trusted in my familiarity with the concepts and used the notes to help recall details, and did much better.

While developing the GOALS cheatsheets we have the same rule—each resource must fit on a single printed page. We almost always have to cut information that we would like to include, but we feel this design decision is part of what makes these resources helpful. They may not provide all the information (the Adobe guide to Acrobat XI accessibility is a 90+ page PDF), but they provide essential information that people are likely to forget or overlook.

Just as a real life cheatsheet won’t get you a good grade on a topic you have never studied, our accessibility cheatsheets will probably not provide enough information for users who are completely unfamiliar with accessibility (even though we know they are sometimes used this way). We have found that they are very useful as handouts at a face-to-face training or as downloadable resources on a support page with additional tutorials. Hopefully they can fill a similar role at your institution.

Learning to Love Headings in Microsoft Word

An institutional commitment to accessible online content must start with the content creators. At most institutions, content usually starts with Microsoft Word. While there are several things content creators can do to improve the accessibility of Word documents for individuals with disabilities (see our cheatsheets on Word for Windows and Word for Mac for specific examples), I am convinced that the single most important thing that they can do to enhance the accessibility of their documents is to start using true headings in Word (headings that appear in the Styles ribbon). In most documents sighted users rely on headings to scan through the document and navigate to relevant sections. Using true headings provides this same functionality to many users with disabilities, especially those who are blind. However, this can be quite an adjustment for someone who is used to creating headings by selecting text and making it bigger, bolder, underlined, centered, etc.

Below I offer a few reasons why using true headings will make life easier not just for individuals with disabilities, but for you, the document creator.

It is faster

It usually takes at least three steps to create false headings: change the text size, add bold or italics (or both), and select a different font. Adding a true heading is much simpler—just select the correct button from the Styles ribbon at the top of the page.

Screenshot of the Styles panel in Word for Windows. Options for Heading 1 and Heading 2 are visible.

If you are a person who likes to use keyboard shortcuts, you can also create heading levels 1-3 by pressing Ctrl + Alt + 1, 2, or 3 (command + option on a Mac). Once this shortcut becomes habit it can save a considerable amount of time.

Changing visual styling is straightforward

The number one complaint I hear from people who choose not to use true headings is that they are ugly or too confining.  While this can be true, changing the appearance of these headings is not as difficult as some may fear. There are two main ways to change the visual style of a page. First, you can change the appearance of the entire document with the Change Styles option on the right-hand side of the Styles ribbon:

Screenshot of the Change Styles option in Word for Windows

Second, if you would rather tweak the appearance of an individual heading level (e.g., you would like your h2s to be italicized), you can accomplish this in Windows by right clicking on a specific heading in the Styles ribbon and selecting Modify. You can even do the reverse—select a block of text that has been styled correctly, right-click the desired heading in the ribbon and choose Update [your heading] to Match Selection. On a Mac you would select the icon to the right of the Styles menu with hover text of “Manage the styles used in this document.” This enables you to modify any part of your heading to achieve the style you desire.

Screenshot of the Manage Styles option

While it does take a while to learn your way around these different options, it becomes a tremendous time saver.

Creating a Table of Contents is simple

If a document has a correct heading structure, Word can also create a table of contents for you based on the document’s heading structure. In Windows, go to the References tab and select Table of Contents. On a Mac, select the Document Elements tab and then you can directly select the Table of Contents in the format you would like it to appear.

Screenshot of the table of contenst options in Word for Mac.

You can also customize the table of contents to change its appearance or choose which heading levels will appear (e.g., Heading levels 1-3). If you make changes to the document that affects page numbers within the table of contents, you can always go back to it and choose Update.

The document is easier to create and to read

There’s a reason your 5th grade teacher taught you to start your essay by creating an outline. Documents that include headings from the start tend to be more consistent in their structure, easier to follow, and even better written. Your readers will be able to read and navigate your pages more efficiently if they can come to expect a consistent heading structure, and I am convinced that you will find it easier to write the document as well.

Faculty member says “HELP – I can’t tag my PDF articles”

From time to time I am reminded of the complexities and nuances inherent in web accessibility. This happens most often when talking to someone new to the effort. I recently visited with a faculty member who is just beginning to address accessibility in her courses. She knows that PDF’s need to be properly tagged to be accessible and she was enthusiastic about doing it, even when it involved retrofitting accessibility elements into her PDF’s. But she was quickly at a stalemate for articles in her course CMS. When this happened she assumed she was doing something wrong, rather than identifying that what was wrong was the document itself. The experience made me reflect on the fact that while we often talk with faculty members about making sure that they have PDF’s that are accessible, we might not provide them with a good enough starting point.

Readers of this blog who are familiar with PDF accessibility know that to start to address accessibility of an existing PDF document, you must have a PDF that was properly created. However, many faculty members don’t create the PDF’s they end up with. If the document is not composed of true text, you must use Optical Character Recognition (OCR) on the document before other accessibility information can be added. While this step is less common all the time (thank heavens), it is important that we help faculty or staff understand how they can tell if PDF’s contain true text to begin with.

This was the step that eluded the faculty member with whom I was talking. She did not know that she needed to determine if her PDF was a scanned image or not. Because of this she assumed that her first step would be the tagging of the document itself. Of course she could not do this because it was in fact an image. Then she assumed she was doing something wrong.

There are many ways for non-technical people to determine if the PDF they wish to make accessible contains true text. Here are two ideas I shared with her and both were easy for her to implement. First, I asked her to see if she could select and copy some portion of text, and second I told her to try to search for some text element on the page. Both were successful strategies for her to determine which pages she could, and could not tag. Getting focus directly onto the text is critical if you will add an element to it (e.g., Header, ordered list).

If you are working with faculty on accessibility issues, or are a faculty or staff member yourself working on accessibility, you may be privy to similar situations in accessibility –- where a simple step was overlooked that proved significant for the person trying to create accessible content. We are very interested in hearing your experiences and sharing them with others. Please consider sharing your tips and experiences here.

Summertime, the perfect time to reflect on accessibility

Summertime for many in higher education is a time to catch up on tasks not completed during the academic year. It is also a time when the seeds are sown for new initiatives and priorities that will be fleshed out and approved in the coming year.  Many individuals, who work on web accessibility for their institution, work beyond the typical nine-month academic calendar. This combination of events makes summer the perfect time to reflect on initiatives for, and outcomes of, the institution’s web accessibility efforts.

Of course when we talk about “web accessibility” we are talking about two things. It is both the process on campus created to improve web accessibility as well as the product of those efforts (i.e., the accessibility of your web content).  We have written about this important coupling before (See Assessing your Institution’s Web Accessibility Efforts; Part 1: Evaluating the Process; Part 2: Evaluating the Product).

I am hopeful this summer you will ask yourself if your campus is ready for an increased focus on web accessibility this coming year.  Some of you are just beginning the process of institution-wide web accessibility efforts –you may be crafting plans to secure administrative support or identifying the best team to guide the campus-wide plans.  Others of you are in the midst of writing draft policies or crafting implementation plans.  Finally, there are others of you who have these in place and are working through the issues to make sure your planned efforts are receiving the resources and supports necessary for success, and will begin a round of assessment by looking at the actual accessibility of pages.

With any of these efforts, knowledge of your institution’s culture of change is vital; is it top-down, or does it require grass roots support?  Knowing this can streamline the support of those in administrative positions who can make sure you have not only the support necessary to complete the work, but also the administrative muscle, to work around the roadblocks that inevitably impede the path. Also critical is your knowledge of other institutional priorities such as increasing diversity at your campus or beginning a cycle of reaffirmation with your regional accreditation commission.  These are times when you might want to reach out to those whose role it is to engage in those priorities and have a conversation about the many outcomes that are indeed shared ones. Often reaching out to coworkers with these shared priorities can be more effective than attempting to tackle accessibility on your own.

So, if your answer is “Yes, I would like to help my campus increase our web accessibility efforts next year”, take the time needed to commit those ideas to paper and reflect on the best strategies to meet your goals.  For some of you it may be time to engage in another round of the GOALS Benchmarking and Planning tool. If you create a new cycle before benchmarking again, you can compare your progress to date.  You may benefit from looking at where you have already made progress to determine next steps.

From all of us at Project GOALS, have a wonderful summer, enjoy some vacation time, and start making plans now for the academic year to come.  Fall always comes sooner than we want.

Budgeting for Web Accessibility

For many units in higher education, April is budget month; these budget requests detail expenditures for the coming fiscal year that will begin July 1. Of course, those line items must be a good fit for the implementation planned in the coming year. To that end we have written a resource for those who are creating budget requests to support web accessibility. It is only through the process of securing an adequate budget that your efforts can succeed.

Joe Biden once famously said; “Don’t tell me what you value, show me your budget, and I’ll tell you what you value.”  If you have budget stories, ideas, or successful strategies to share with others to help with their budget process, please share them here. I look forward to seeing how creative others have become to secure the budget that is needed for web accessibility efforts.

All Roads Lead to Rome

We are hearing a lot from the 46 campuses involved as Participating Institutions in the GOALS Benchmarking and Planning Process. A surprising and wonderful element we have uncovered is the different ways campuses have approached completion of their institution wide self-study. It seems fitting to share this information with others, especially those new to the process. Because, while different processes have been used to achieve successful results, it appears that all roads lead to Rome in using the tool to get to intended outcomes.

By way of background, the GOALS Benchmarking and Planning Tool was created to support asynchronous communication within an institutional study team. The team leader would facilitate the rest of the team as together, they determine their institution’s response to self-study questions as well as their next steps (i.e., their Action Plan for moving forward). It was thought that by developing the tool this way it would support anytime anywhere participation, thus enabling institutions to include members from across campus (or campuses) and eliminating the need to “schedule” meetings.

While our decision was made to provide the greatest flexibility to an institution, we have heard that it is not always the best match. Some teams found difficulties in getting team members to engage in an asynchronous process in a timely way. Some members had never encountered online collaborative work before and this became an issue for them. For others, timelines for completion were not well stated. Also, for some, this self-study was an easy task to set aside either due to competing demands on their time or because the items they were asked to complete were unfamiliar to them (e.g., staff members from the Library might be unaware of how to respond to items regarding procurement policies). When others on the team waited for responses, this created an endless game of “hot potato” at some institutions. All in all, for many institutions, it made for a protracted process that took way too long to complete.

To avoid this, institutions began using creative processes to complete the self-study and action plan. These alternative processes were a superior fit to their needs and circumstances. Here are alternate ways institutions are engaging with the Benchmarking and Planning Tool with good outcomes.

  1. Some institutions have jettisoned the idea of the team leader facilitating an asynchronous study team altogether. Instead they brought everyone into a face-to-face meeting. It seems that this resolves issues of waiting for some to finish items and enables a large volume of work to be completed succinctly. Variations on this method include:
    1. A full-day retreat in a meeting room on campus
    2. Face-to-face meetings scheduled well in advance for 2 hours each week for a month.
    3. Use of technology to create face-to-face meetings if participants are not co-located (e.g., Adobe Connect; Skype video chat with multiple connections; PolyCom)
  2. At one institution, the Team Leader recognized that it was not the most effective or efficient use of staff time to have everyone participate throughout all Indicators. So she identified pertinent members to participate at key points in time. For example, she only engaged Human Resources as they discussed how they are securing and retaining technical personnel with expertise in accessibility. Each week, she would provide assignments to different members of the team, and she made sure everyone had completed these assignments prior to the next week. In this way the expertise of the diverse stakeholders was captured without putting them in situations where they felt they did not have contributions to make. Moreover, she was able to shepherd the process along with timely completion.

If you have used an alternate process while engaged in the GOALS self-study at your institution, please share it here. Others will benefit from hearing how local solutions improved your ability to complete this important process.